

What Oleria discovers
Oleria discovers whatever your CSV files contain and yourconfig.yaml maps, including:
- Accounts and identities - application users, service accounts, and IdP users.
- Roles and groups - roles, permission sets, groups, and teams, plus which accounts belong to each.
- People and HR data - person and employee records, departments, and managers.
- Activity - audit log events, one row per event.
How it works
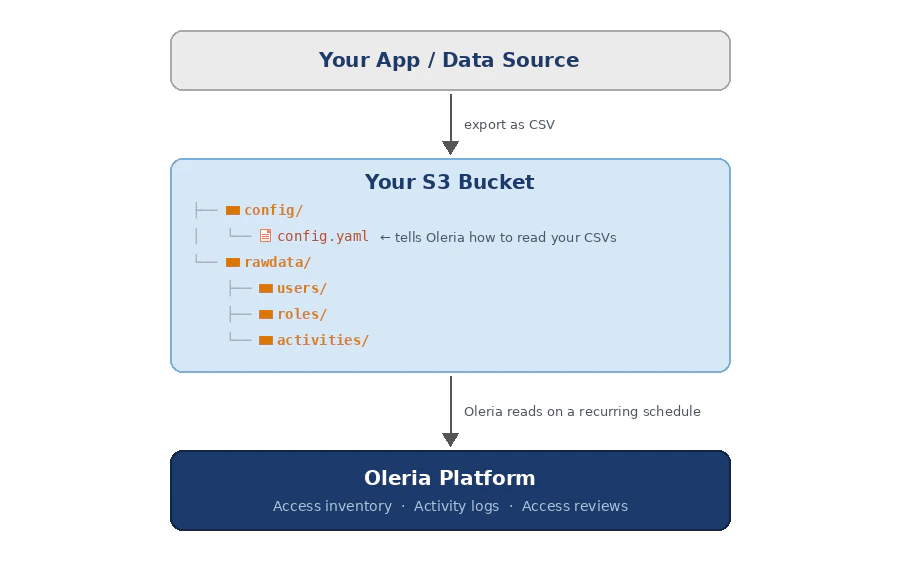
Prerequisites
- An Amazon S3 bucket in your AWS account where you will upload your data.
- AWS IAM admin access to add a bucket policy to that S3 bucket.
- Your application’s data exported as CSV files (comma-separated values with a header row).
Use a dedicated S3 bucket or a scoped prefix within your bucket for Oleria data to limit access to only what is needed.
Set up your S3 bucket
1
Create or identify your S3 bucket
Create or identify the S3 bucket you will use to share data with Oleria.
2
Organize your files
Organize your files inside the bucket using the following folder structure: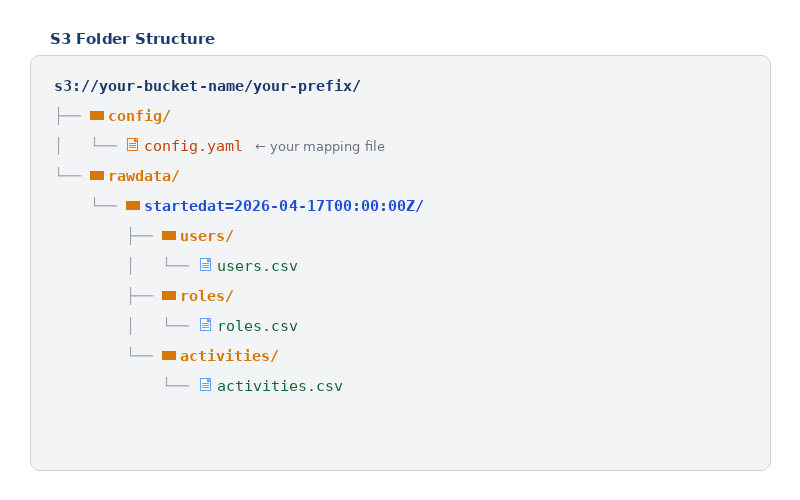
The
config/ folder must contain exactly one .yaml file - Oleria discovers it automatically. The date-stamped folder under rawdata/ (for example, startedat=2026-04-17T00:00:00Z) tells Oleria which data is new. Each time you export fresh data, create a new folder with the current timestamp. Oleria always picks the most recent one. If your data does not change frequently, you can place your CSV subfolders directly inside rawdata/ without a date-stamped folder.Prepare your CSV files
Your CSV files must have a header row. The column names in the header are what you reference in theconfig.yaml file. Column names can be anything - you map them to Oleria’s fields in the config.
Example users.csv:
roles.csv:
user_roles.csv (membership - which user has which role):
Create your config.yaml
Theconfig/config.yaml file maps your CSV columns to Oleria’s data model. Your Oleria Customer Success team can provide a starting config based on your data, or you can write it yourself using the format below.
What object types can I map to?
Entity objects - use these for things like users, roles, and groups:
Relationship objects - connect two entities together. Always use the
links shorthand for these:
source.s3 fields
These fields go inside source.s3 in your config.yaml. They tell Oleria how your S3 data is organized.
field_mappings vs links
Available fields reference
Available fields reference
applicationaccount and identity - Application & IdP users
role - Roles & permission sets
usergroup - Groups & teams
person - HR person records
employee - HR employee records
department - Departments & org units
activity_analysis - Audit logs & events
application_instance - IdP-managed applications
role - Roles & permission sets
usergroup - Groups & teams
person - HR person records
employee - HR employee records
department - Departments & org units
activity_analysis - Audit logs & events
application_instance - IdP-managed applications
Minimum viable example
The simplest possible config - application users and roles, with a membership relationship:Full example (HR system)
This example models an HR export with employees, departments, and org hierarchy:config.yaml and matching CSV files. The config downloads as config.yaml.txt; save it as config.yaml in your bucket’s config/ folder:
- HR system sample:
config.yaml,employees.csv,department_hierarchy.csv - PostgreSQL sample:
config.yaml,users.csv,roles.csv,user_role_assignments.csv,activities.csv
config/ for the YAML file and one subfolder per CSV under rawdata/.
Grant Oleria access to your S3 bucket
Oleria reads your data using a dedicated AWS IAM role. You need to add a bucket policy that allows this role to read your files.1
Get the Oleria IAM role ARN
Your Oleria Customer Success team will provide you with the exact IAM role ARN for your environment. The role follows this format:
2
Add a bucket policy
Go to your S3 bucket in the AWS Console -> Permissions tab -> Bucket policy -> Edit, and paste the following policy. Replace the placeholders with your values and select Save changes.
3
Update the KMS key policy (if applicable)
If your S3 bucket is encrypted with a customer-managed KMS key, update the KMS key policy. Go to AWS KMS -> select your key -> Key policy -> Edit, and add the following statement:
Connect your custom application to Oleria
1
Open the integration
Go to your Oleria workspace, select Integrations -> select Custom Application.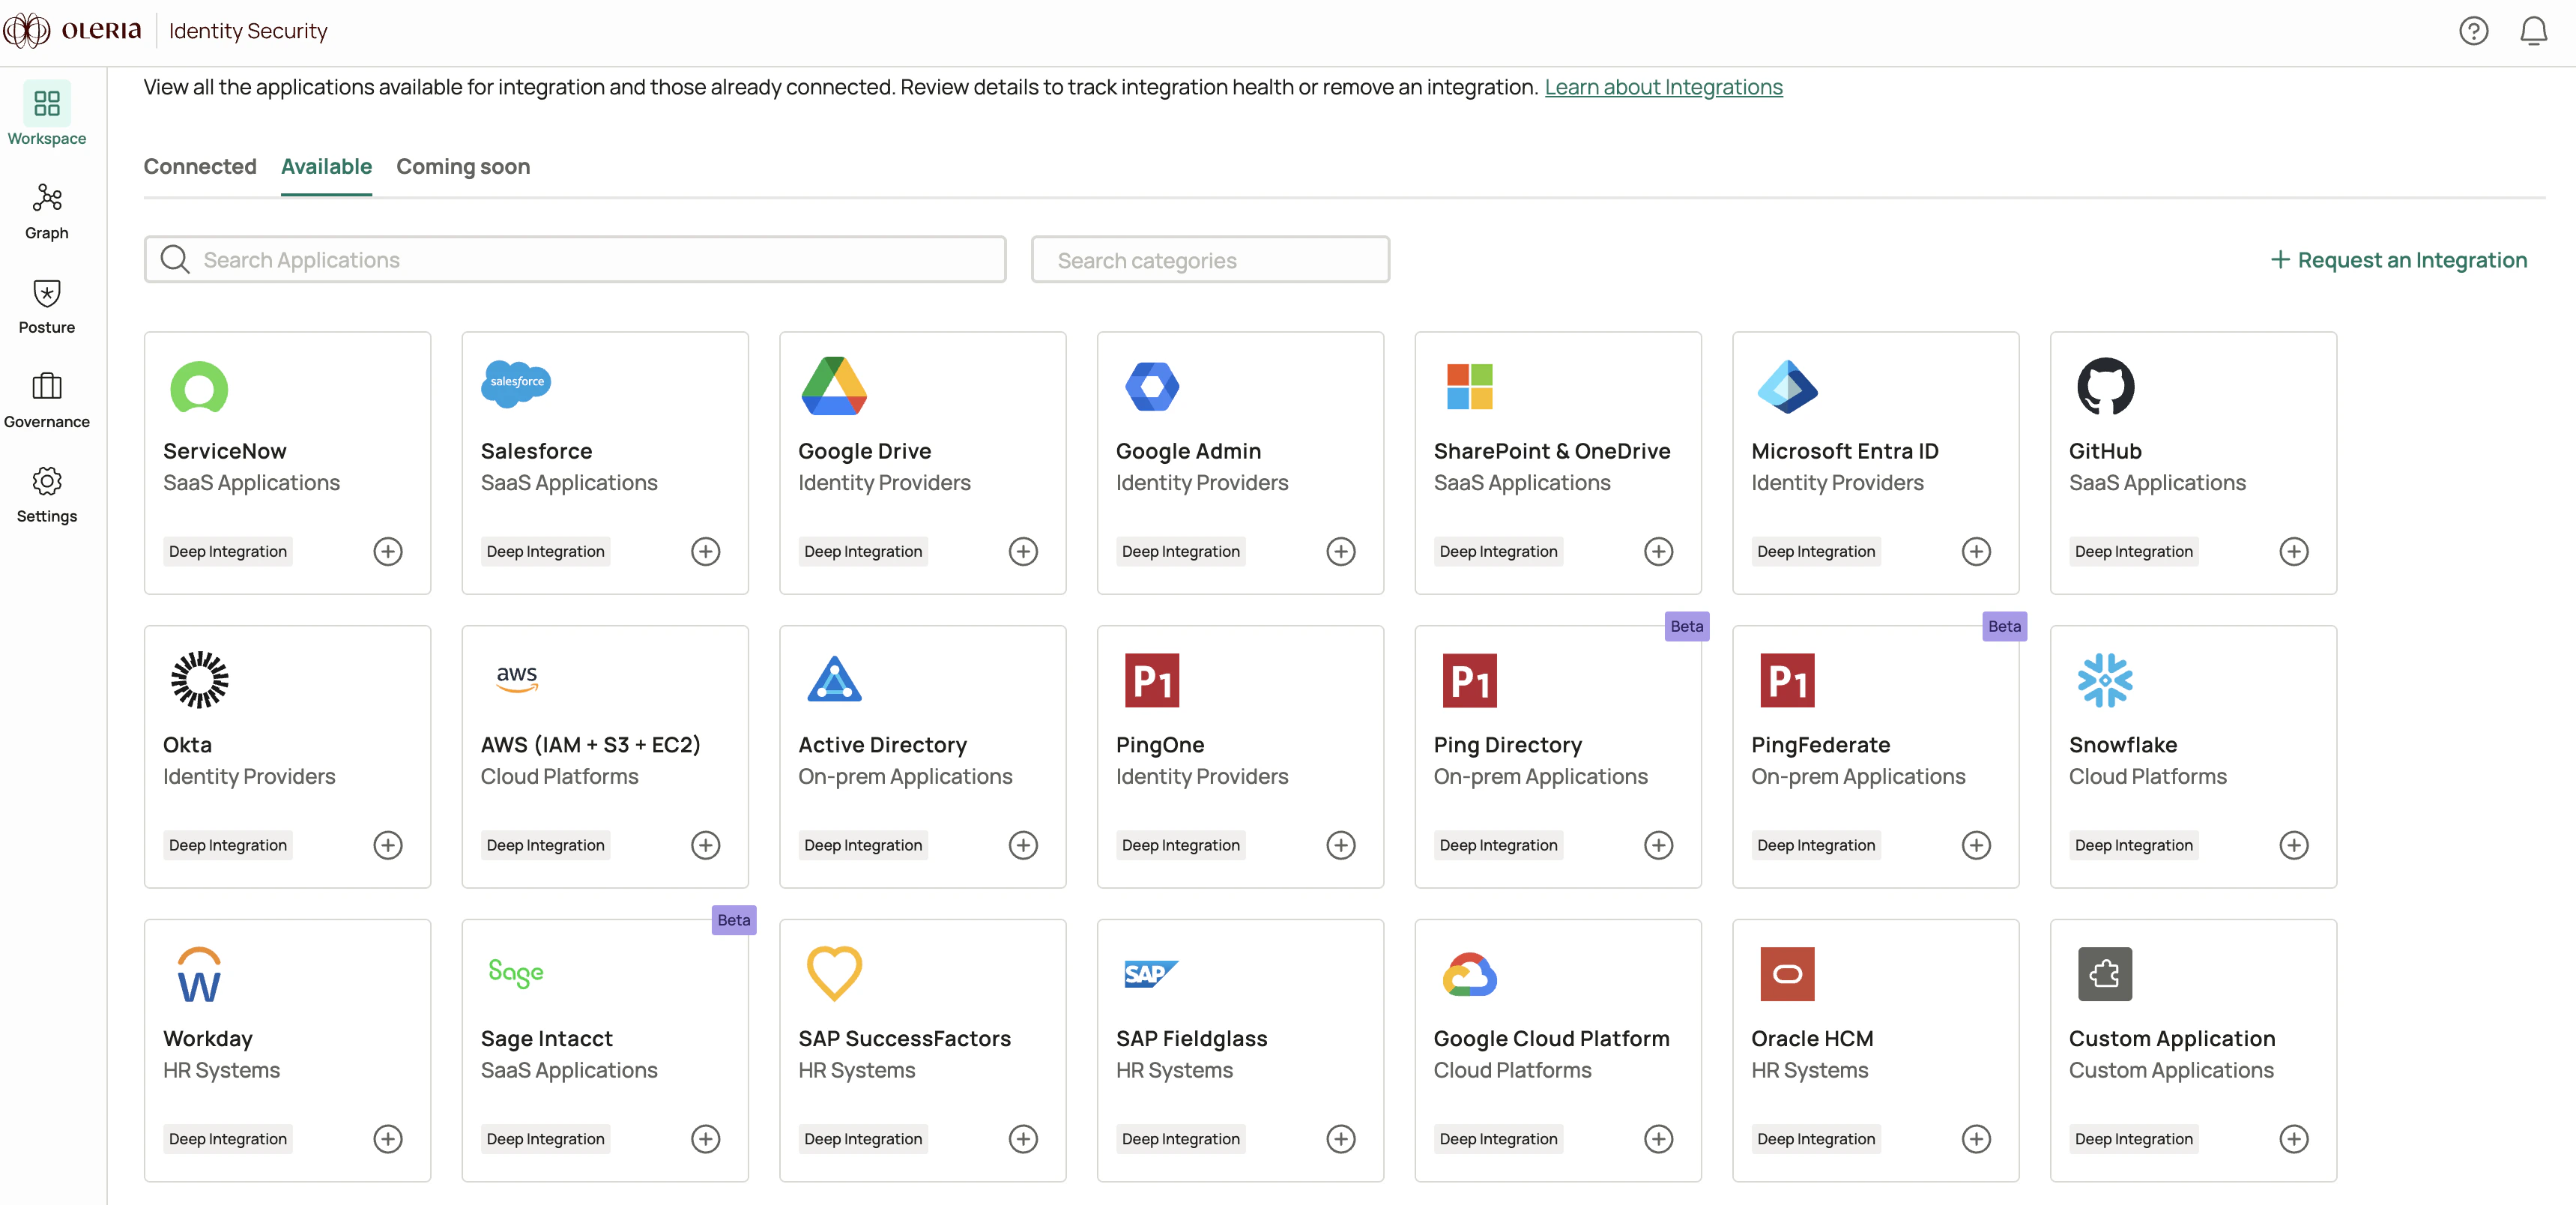
2
Complete the connection form
Fill in the connection form that appears:
-
Application Name - a label for this integration in Oleria. Use a name that describes your data source (for example,
Internal HR apporFinance database). -
S3 Data Path - the full S3 URL to the root folder of your data. This is the folder that contains your
config/andrawdata/subfolders. Example:s3://your-bucket-name/your-prefix/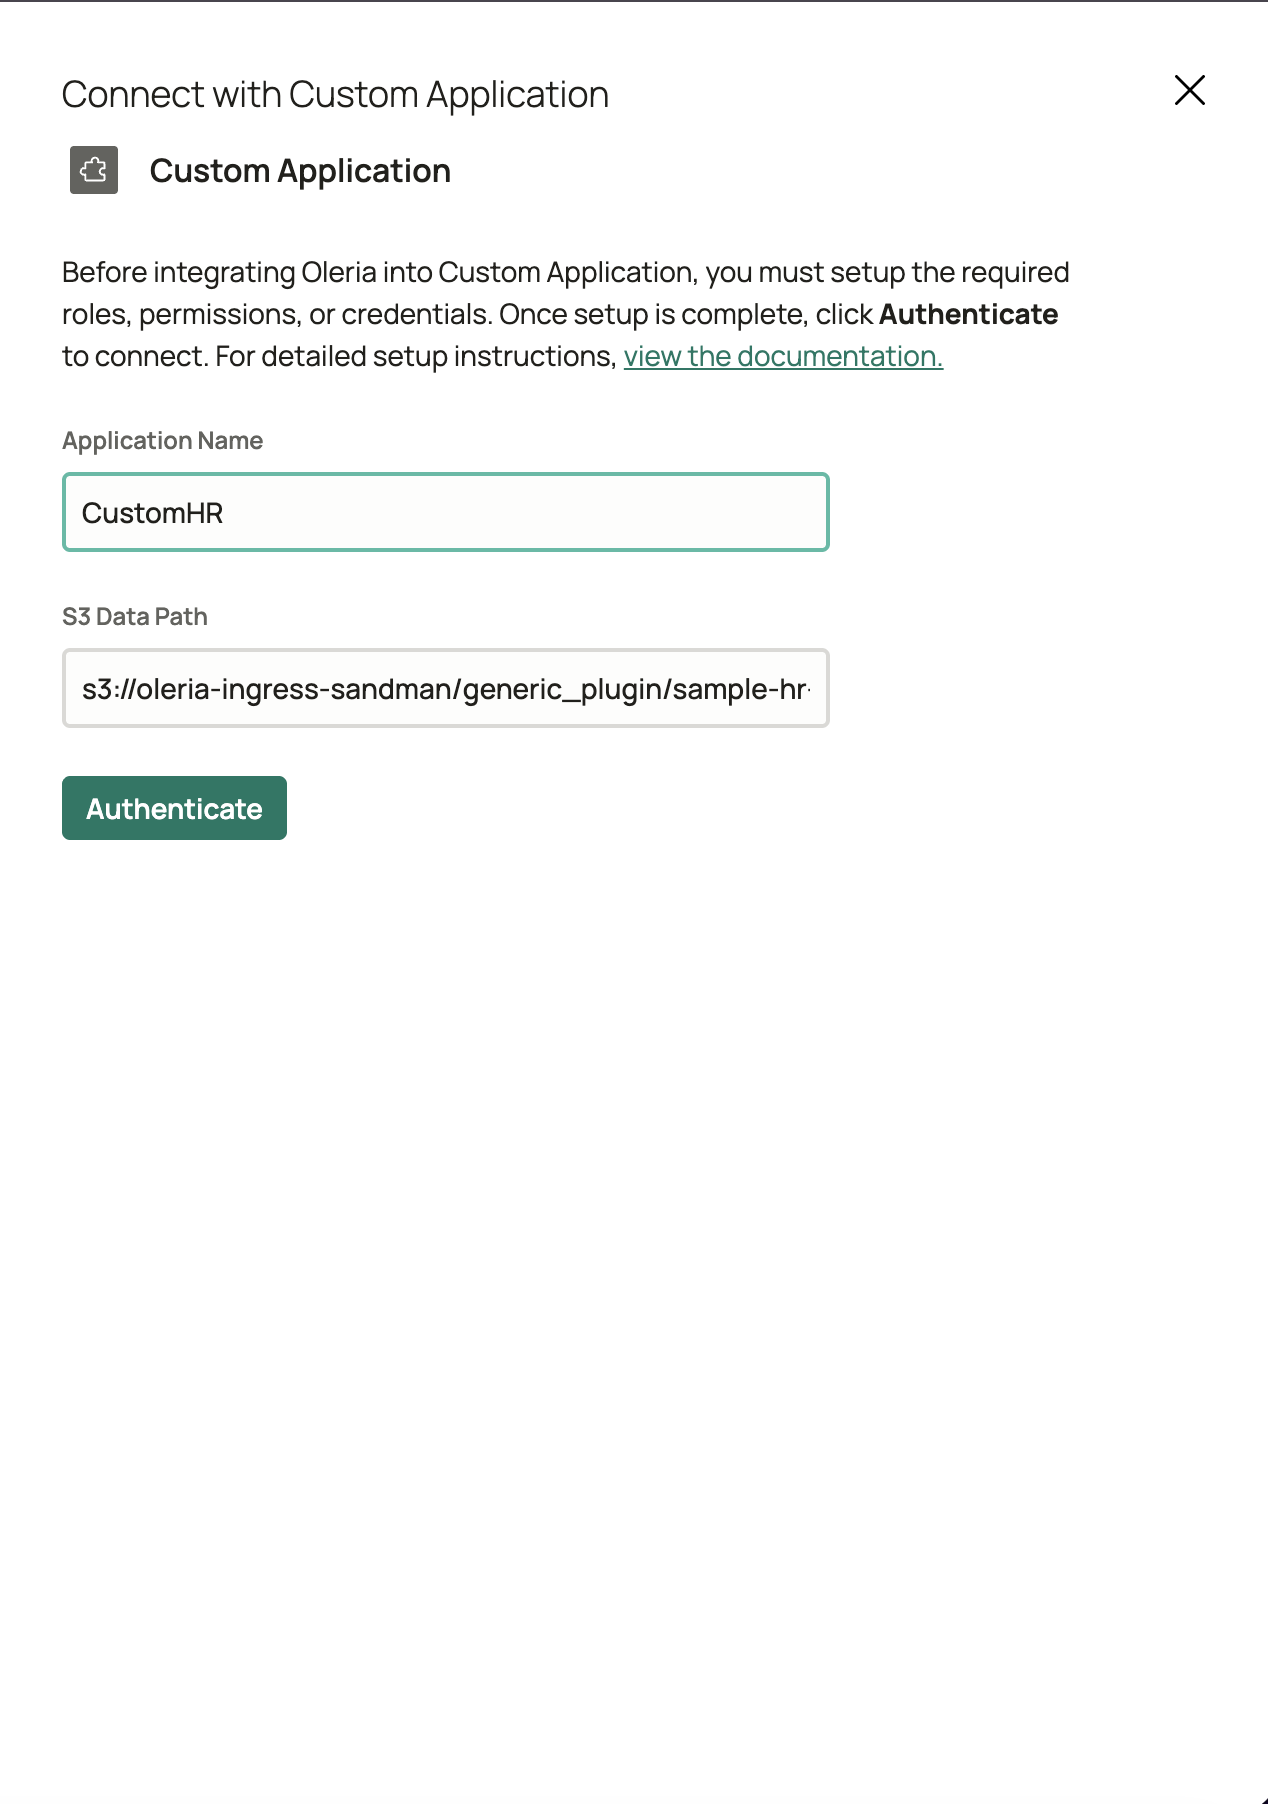
3
Authenticate
Select Authenticate. Oleria will verify it can reach your S3 bucket and read your configuration file.
Verify the integration
Confirm the Custom Application instance appears on the Connected tab of your Oleria Integrations page with a status of Healthy. After the first sync completes, you can review the discovered accounts, roles, groups, and activity in your Oleria workspace. Oleria syncs this integration on its regular sync schedule, and only processes data when new files are available.
Troubleshooting
Oleria checks your bucket, configuration, and data folders when you select Authenticate. If something is wrong, Authenticate fails with one of these errors:
If Authenticate succeeds but new data doesn’t appear, upload each fresh export to a new timestamped folder under
rawdata/. When you use partition folders, Oleria reads the newest one.