> ## Documentation Index
> Fetch the complete documentation index at: https://docs.oleria.com/llms.txt
> Use this file to discover all available pages before exploring further.

# Salesforce

Oleria provides adaptive and autonomous access security that sets your business free. As part of that promise, we provide deep integration of your Salesforce application into the Oleria platform. This document provides step-by-step guidance to integrate your Salesforce application instance with the Oleria workspace.

Oleria supports Sales Cloud and Service Cloud.
<img src="https://mintcdn.com/oleria/qn6A7RIhybLn0JXz/images/integrations/salesforce/step-1.png?fit=max&auto=format&n=qn6A7RIhybLn0JXz&q=85&s=c71b9520547cd3eac6dc2391be58ffe4" alt="Oleria supports Sales Cloud and Service Cloud" width="800" height="375" data-path="images/integrations/salesforce/step-1.png" />

## Prerequisites

* Salesforce Admin role

<Note>Use a service account (and not an employee account) with the suggested privileges for the integration to ensure continuity.</Note>

## Create the Oleria App in Salesforce

<Steps>
  <Step title="Open the integration">
    Log in to your Oleria workspace, select **Integrations** → select **Salesforce**.
  </Step>

  <Step title="Review prerequisites and continue">
    A side page opens with prerequisites and a link to the onboarding instructions. Select **Continue**.
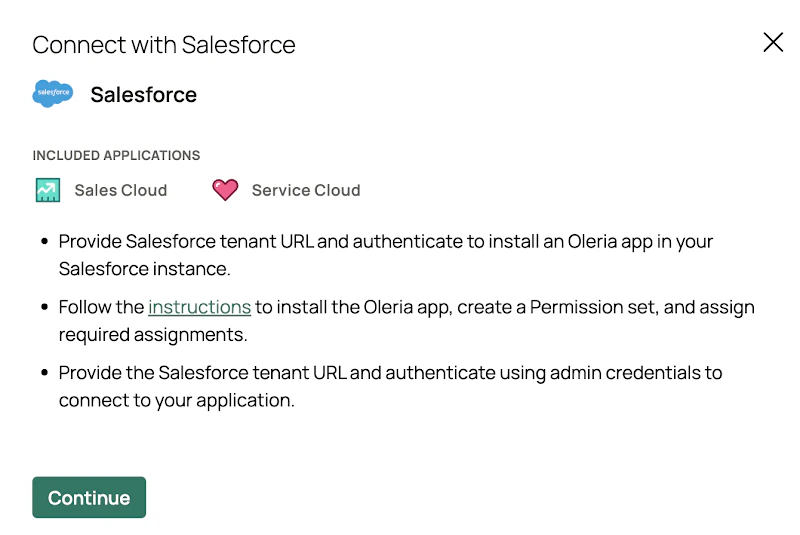
    <img src="https://mintcdn.com/oleria/qn6A7RIhybLn0JXz/images/integrations/salesforce/step-3.png?fit=max&auto=format&n=qn6A7RIhybLn0JXz&q=85&s=3063e11b501f2f05f8c6577c45d2ec7a" alt="Opens a side page with pre-requisites and a link to the onboarding instructions. Click Continue" width="800" height="535" data-path="images/integrations/salesforce/step-3.png" />
  </Step>

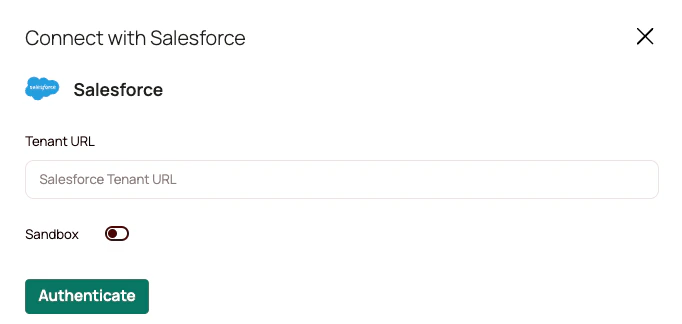
  <Step title="Provide your Salesforce URL">
    Provide your Salesforce URL and select **Authenticate**.
    <img src="https://mintcdn.com/oleria/qn6A7RIhybLn0JXz/images/integrations/salesforce/step-4.png?fit=max&auto=format&n=qn6A7RIhybLn0JXz&q=85&s=8f8a538ffb71775fe92894899eab184c" alt="Provide your Salesforce URL and click Authenticate." width="682" height="324" data-path="images/integrations/salesforce/step-4.png" />

    <Note>Turn the Sandbox switch on if you are integrating a Salesforce sandbox environment.</Note>
  </Step>

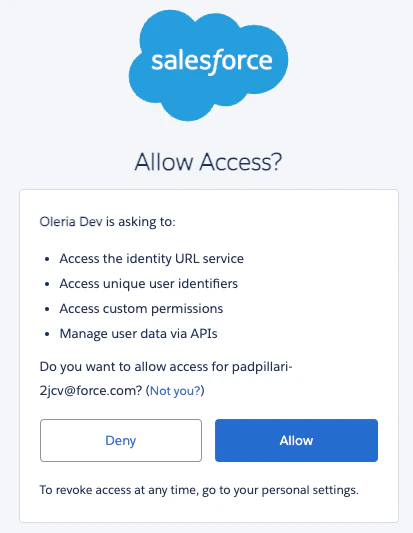
  <Step title="Authorize Oleria access">
    Authorize Oleria access to create a connected app called **Oleria** in your Salesforce application.
    <img src="https://mintcdn.com/oleria/qn6A7RIhybLn0JXz/images/integrations/salesforce/step-5.png?fit=max&auto=format&n=qn6A7RIhybLn0JXz&q=85&s=31e7be796456dfed2dfdb1a4c2644f13" alt="Authorize Oleria access to create a connected app called &#x22;Oleria&#x22; in your Salesforce application." width="413" height="533" data-path="images/integrations/salesforce/step-5.png" />

    <Note>You will see an error notification: **"User hasn't approved this consumer"**. Ignore this message and continue with the next sections to install the Oleria app and Oleria Access permission set in your Salesforce application.</Note>

    <img src="https://mintcdn.com/oleria/qn6A7RIhybLn0JXz/images/integrations/salesforce/step-6.png?fit=max&auto=format&n=qn6A7RIhybLn0JXz&q=85&s=75621ba691ca01205ba3e26b7d148671" alt="Salesforce integration error: User hasn't approved this consumer" width="515" height="77" data-path="images/integrations/salesforce/step-6.png" />
  </Step>
</Steps>

## Install the Oleria App in Salesforce

<Steps>
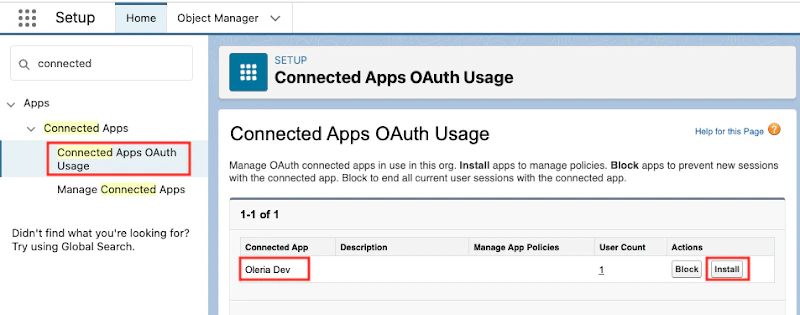
  <Step title="Find and install the Oleria app">
    Log in to your Salesforce application, search for **Connected Apps OAuth Usage**, select the **Oleria** app, and select **Install**.
    <img src="https://mintcdn.com/oleria/qn6A7RIhybLn0JXz/images/integrations/salesforce/step-7.png?fit=max&auto=format&n=qn6A7RIhybLn0JXz&q=85&s=359e4061b9d6bc42daab00bca9ad1804" alt="Salesforce Connected Apps OAuth Usage page with Oleria app and Install button" width="800" height="315" data-path="images/integrations/salesforce/step-7.png" />
  </Step>

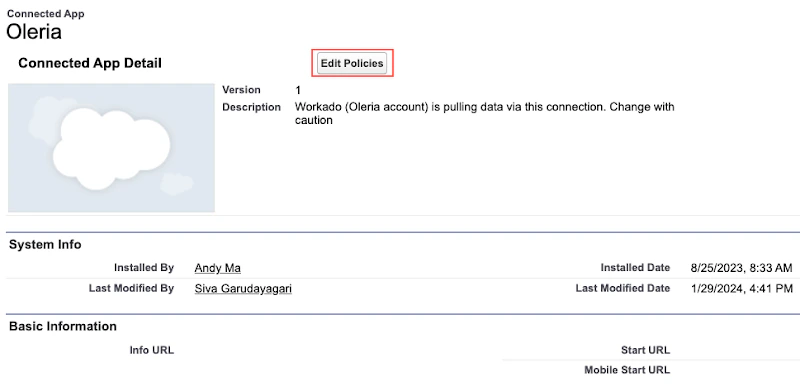
  <Step title="Edit policies">
    After completing the Oleria app installation, select **Edit Policies**.
    <img src="https://mintcdn.com/oleria/qn6A7RIhybLn0JXz/images/integrations/salesforce/step-8.png?fit=max&auto=format&n=qn6A7RIhybLn0JXz&q=85&s=57002671ad84bec47bf59ed9b723cbfe" alt="After completing  the Oleria app installation, select &#x22;Edit Policies&#x22;" width="800" height="391" data-path="images/integrations/salesforce/step-8.png" />
  </Step>

  <Step title="Configure OAuth policies">
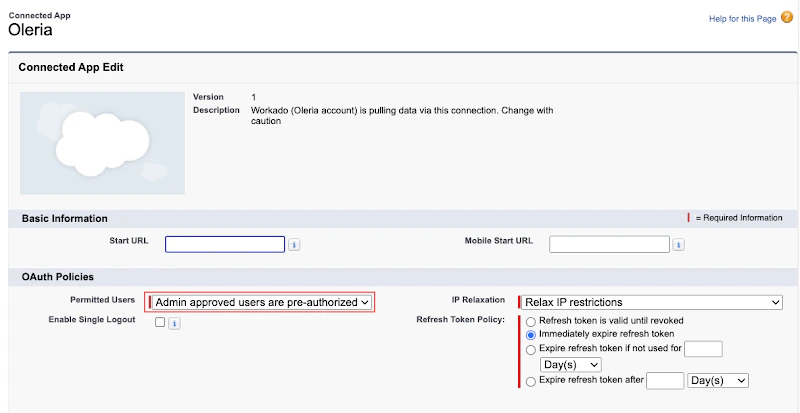
    Navigate to the **OAuth Policies** section, set **Permitted Users** to **Admin approved users are pre-authorized**, and select **Save**.
    <img src="https://mintcdn.com/oleria/qn6A7RIhybLn0JXz/images/integrations/salesforce/step-9.png?fit=max&auto=format&n=qn6A7RIhybLn0JXz&q=85&s=c33e7449e424b42b3c310c326cb3b5a7" alt="Salesforce OAuth Policies section with Permitted Users set to Admin approved users" width="800" height="413" data-path="images/integrations/salesforce/step-9.png" />
  </Step>
</Steps>

## Create a Permission Set for Oleria Access

<Steps>
  <Step title="Create the permission set">
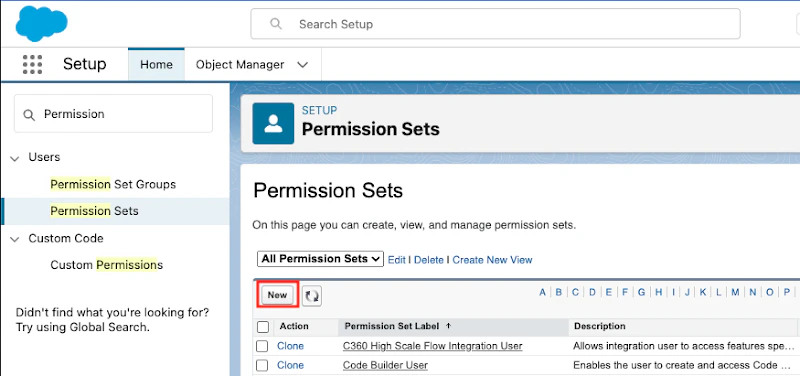
    Navigate to **Permission Sets** and select **New** to create a new permission set named **Oleria Access**.
    <img src="https://mintcdn.com/oleria/qn6A7RIhybLn0JXz/images/integrations/salesforce/step-10.png?fit=max&auto=format&n=qn6A7RIhybLn0JXz&q=85&s=4b177db358e36c1ff45253aa689c561f" alt="Navigate to Permission Sets and select New to create a new permission set &#x22;Oleria Access&#x22;" width="800" height="376" data-path="images/integrations/salesforce/step-10.png" />
  </Step>

  <Step title="Configure the permission set">
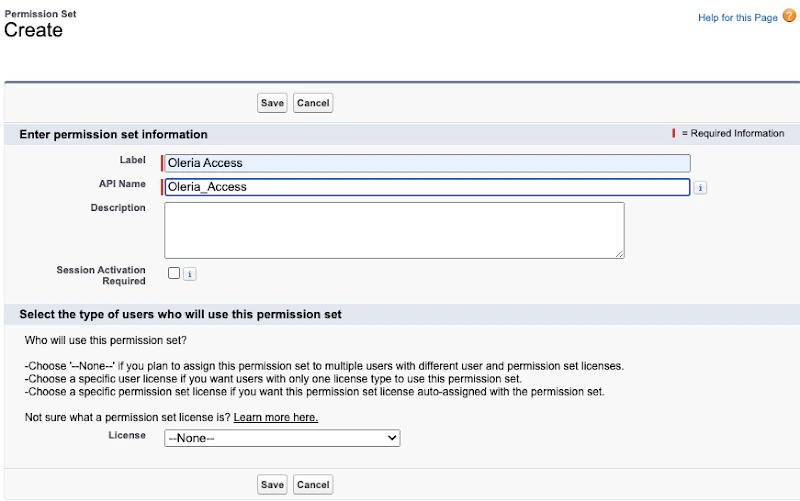
    Set the **Label** to **Oleria Access** and configure the API Name as shown below, then save the permission set.
    <img src="https://mintcdn.com/oleria/qn6A7RIhybLn0JXz/images/integrations/salesforce/step-11.png?fit=max&auto=format&n=qn6A7RIhybLn0JXz&q=85&s=002599e8c71d20cb850714b01a740017" alt="Give Label as &#x22;Oleria Access&#x22; and API Name as shown below, save the permission set." width="800" height="501" data-path="images/integrations/salesforce/step-11.png" />
  </Step>

  <Step title="Assign a user">
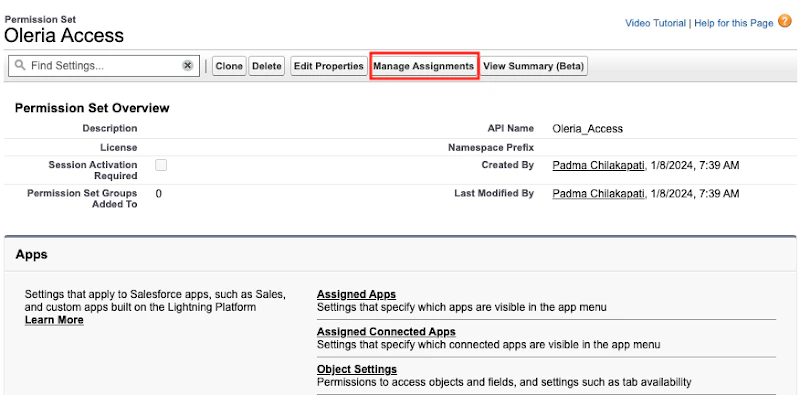
    Open the **Oleria Access** permission set and select **Manage Assignments** to assign a user.
    <img src="https://mintcdn.com/oleria/qn6A7RIhybLn0JXz/images/integrations/salesforce/step-12.png?fit=max&auto=format&n=qn6A7RIhybLn0JXz&q=85&s=597c25f8b0ed79903d1f3390e7df3499" alt="Open Oleria Access Permission set, select  Manage Assignments to assign  a user" width="800" height="395" data-path="images/integrations/salesforce/step-12.png" />

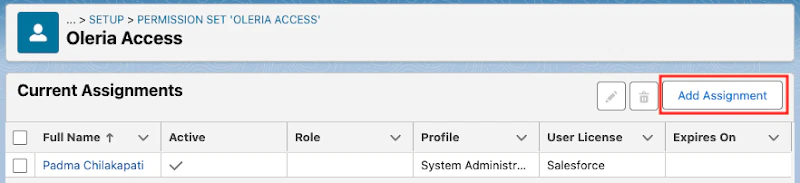
    Select **Add Assignment** and assign the user.
    <img src="https://mintcdn.com/oleria/qn6A7RIhybLn0JXz/images/integrations/salesforce/step-13.png?fit=max&auto=format&n=qn6A7RIhybLn0JXz&q=85&s=c074ec3af39958fe94fd230f705729fb" alt="Select Add Assignment and assign a user" width="800" height="183" data-path="images/integrations/salesforce/step-13.png" />
  </Step>

  <Step title="Assign the Oleria connected app">
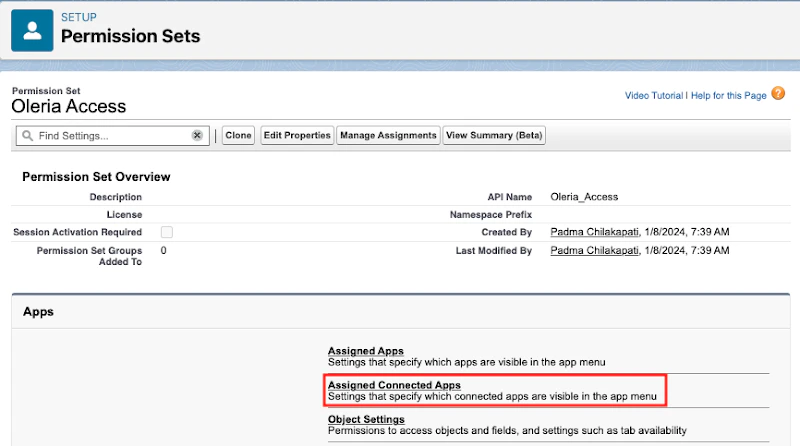
    Open the **Oleria Access** permission set and select **Assigned Connected Apps** to add the **Oleria** app to the permission set.
    <img src="https://mintcdn.com/oleria/qn6A7RIhybLn0JXz/images/integrations/salesforce/step-14.png?fit=max&auto=format&n=qn6A7RIhybLn0JXz&q=85&s=0e24bb2fb29b26979a0f4a3ddbbdf327" alt="Oleria Access Permission set Assigned Connected Apps section" width="800" height="446" data-path="images/integrations/salesforce/step-14.png" />

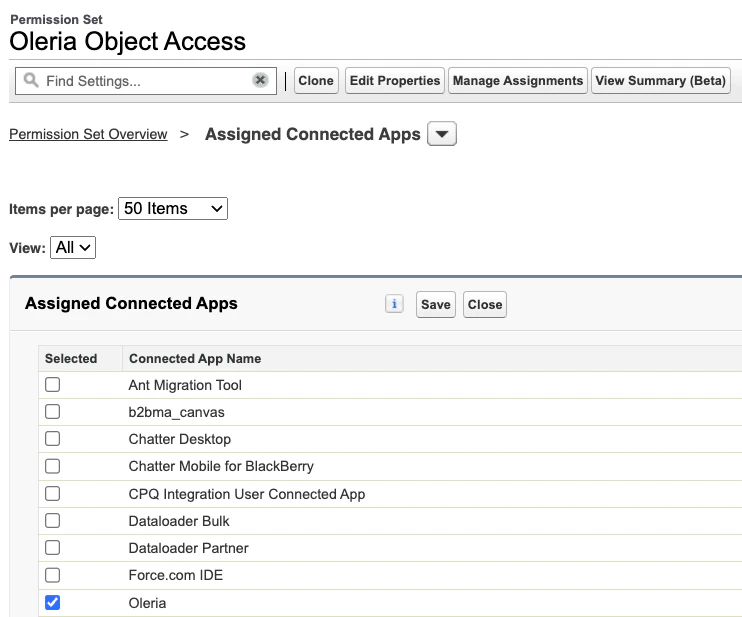
    Select **Edit** in the Assigned Connected Apps section, select **Oleria**, and select **Save**.
    <img src="https://mintcdn.com/oleria/qn6A7RIhybLn0JXz/images/integrations/salesforce/step-15.png?fit=max&auto=format&n=qn6A7RIhybLn0JXz&q=85&s=9b1b90d56517483556f0973f282eaf8d" alt="Select Edit in the Assigned Connected Apps section, select Oleria and click save." width="742" height="617" data-path="images/integrations/salesforce/step-15.png" />
  </Step>

  <Step title="Configure system permissions">
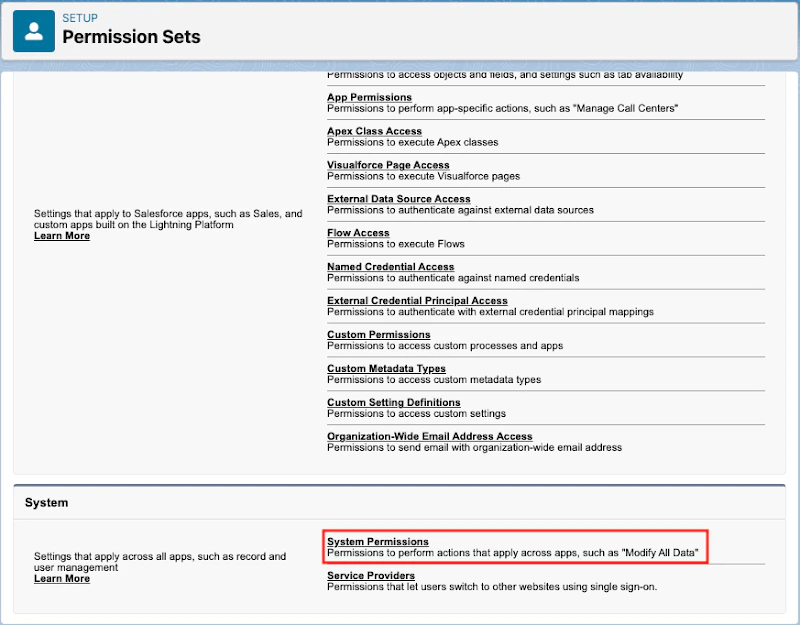
    Select **System Permissions**.

    <img src="https://mintcdn.com/oleria/qn6A7RIhybLn0JXz/images/integrations/salesforce/step-16.png?fit=max&auto=format&n=qn6A7RIhybLn0JXz&q=85&s=9259985dc047d02552145d37b1583f89" alt="Select System Permissions" width="800" height="625" data-path="images/integrations/salesforce/step-16.png" />

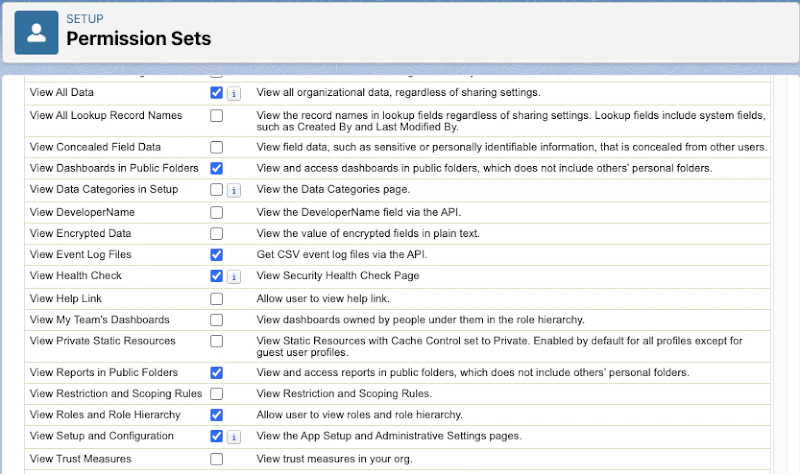
    Select **Edit** and select **View All Data**, **View Health Check**, and **Manage Multi-Factor Authentication in API**.

    <img src="https://mintcdn.com/oleria/qn6A7RIhybLn0JXz/images/integrations/salesforce/step-17.png?fit=max&auto=format&n=qn6A7RIhybLn0JXz&q=85&s=5d446e5e0f28d81184d368ca62341286" alt="Salesforce System Permissions with View All Data and View Health Check selected" width="800" height="474" data-path="images/integrations/salesforce/step-17.png" />

    <img src="https://mintcdn.com/oleria/qn6A7RIhybLn0JXz/images/integrations/salesforce/step-18.png?fit=max&auto=format&n=qn6A7RIhybLn0JXz&q=85&s=6f08e64108695cba75ce42779dfd9d72" alt="Salesforce System Permissions continued with MFA management permission selected" width="800" height="95" data-path="images/integrations/salesforce/step-18.png" />

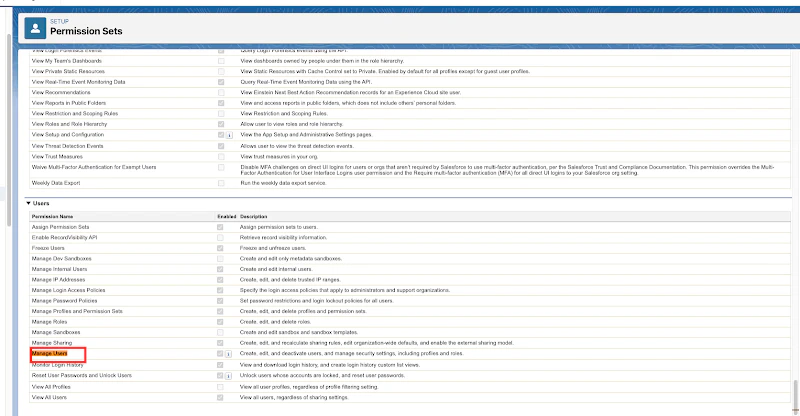
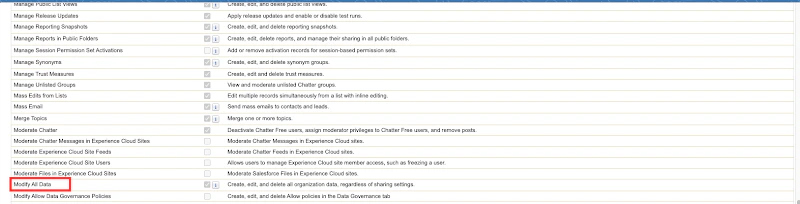
    To perform remediations, also select the following permissions:

    * To **disable accounts** - enable **Manage Users**
          <img src="https://mintcdn.com/oleria/qn6A7RIhybLn0JXz/images/integrations/salesforce/step-19.png?fit=max&auto=format&n=qn6A7RIhybLn0JXz&q=85&s=9bb0f32c801604a2a1573c8d20ae135b" alt="To 'disable account', enable Manage Users under permission sets" width="800" height="416" data-path="images/integrations/salesforce/step-19.png" />

    * To **remove users from groups** - enable **Modify All Data**
          <img src="https://mintcdn.com/oleria/qn6A7RIhybLn0JXz/images/integrations/salesforce/step-20.png?fit=max&auto=format&n=qn6A7RIhybLn0JXz&q=85&s=01941fc6d5ad9941101a4066ada5f12e" alt="To 'remove user from group', enabled Modify All Data under permission sets" width="800" height="204" data-path="images/integrations/salesforce/step-20.png" />

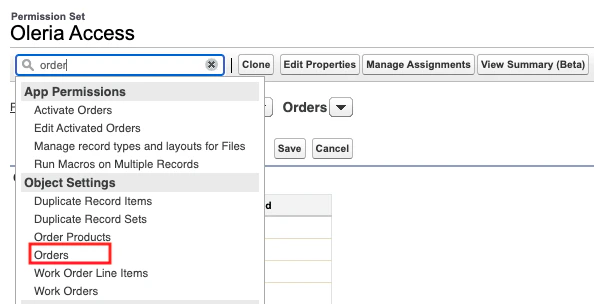
    Search for and select **Orders**.

    <img src="https://mintcdn.com/oleria/qn6A7RIhybLn0JXz/images/integrations/salesforce/step-21.png?fit=max&auto=format&n=qn6A7RIhybLn0JXz&q=85&s=464baa29984a8a1dd0b98c5c74df08ef" alt="Search order and select Orders" width="594" height="304" data-path="images/integrations/salesforce/step-21.png" />

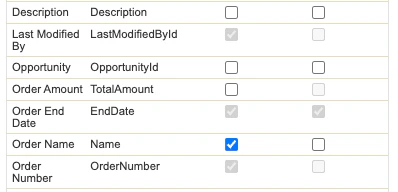
    Select **Edit** and select **Order Name** as shown below.
    <img src="https://mintcdn.com/oleria/qn6A7RIhybLn0JXz/images/integrations/salesforce/step-22.png?fit=max&auto=format&n=qn6A7RIhybLn0JXz&q=85&s=8c34fcc963e7d75368da762fa9f5bba0" alt="Click Edit and select Order Name as shown below" width="398" height="192" data-path="images/integrations/salesforce/step-22.png" />

    <Note>Skip the Orders step if the Orders object does not exist.</Note>
  </Step>
</Steps>

## Configure Event Monitoring

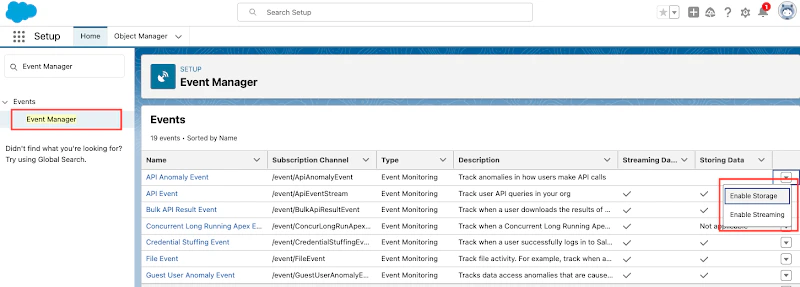
Oleria recommends enabling and configuring Event Monitoring (Shield) in your Salesforce instance. This captures all user activity and provides insights into it. Without Event Monitoring (Shield), user activity insights are limited to login and logout activities.

<Steps>
  <Step title="Enable Event Manager storage and streaming">
    Select **Set up** → search **Event Manager** → enable **Storage** and **Streaming** for all events.
    <img src="https://mintcdn.com/oleria/qn6A7RIhybLn0JXz/images/integrations/salesforce/step-23.png?fit=max&auto=format&n=qn6A7RIhybLn0JXz&q=85&s=1eb967a690cdfda66cebd6aab49c31e1" alt="Select Set up → search Event Manager -> Enable storage and Enable streaming for all the events" data-og-width="800" width="800" data-og-height="287" height="287" data-path="images/integrations/salesforce/step-23.png" data-optimize="true" data-opv="3" srcset="https://mintcdn.com/oleria/qn6A7RIhybLn0JXz/images/integrations/salesforce/step-23.png?w=280&fit=max&auto=format&n=qn6A7RIhybLn0JXz&q=85&s=df79f18f6e20ea593236aa04c686841d 280w, https://mintcdn.com/oleria/qn6A7RIhybLn0JXz/images/integrations/salesforce/step-23.png?w=560&fit=max&auto=format&n=qn6A7RIhybLn0JXz&q=85&s=e5a8cc4c946e123a8e81a47af3a05db1 560w, https://mintcdn.com/oleria/qn6A7RIhybLn0JXz/images/integrations/salesforce/step-23.png?w=840&fit=max&auto=format&n=qn6A7RIhybLn0JXz&q=85&s=075dc2eb4a46a27e33aa06718bd4f0ba 840w, https://mintcdn.com/oleria/qn6A7RIhybLn0JXz/images/integrations/salesforce/step-23.png?w=1100&fit=max&auto=format&n=qn6A7RIhybLn0JXz&q=85&s=6bbd5a3f9a8d34a7607c8e42e0b4965d 1100w, https://mintcdn.com/oleria/qn6A7RIhybLn0JXz/images/integrations/salesforce/step-23.png?w=1650&fit=max&auto=format&n=qn6A7RIhybLn0JXz&q=85&s=cfcc4c45c94c7e7234f064d01be319ce 1650w, https://mintcdn.com/oleria/qn6A7RIhybLn0JXz/images/integrations/salesforce/step-23.png?w=2500&fit=max&auto=format&n=qn6A7RIhybLn0JXz&q=85&s=de44c4246e87216b0aa17b6b2db2cc96 2500w" />
  </Step>
</Steps>

## Connect Salesforce to Oleria

<Steps>
  <Step title="Open the integration">
    Go to your Oleria workspace, select **Integrations** → select **Salesforce**.
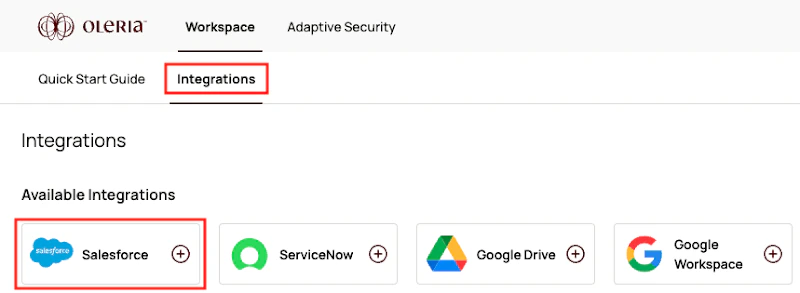
    <img src="https://mintcdn.com/oleria/qn6A7RIhybLn0JXz/images/integrations/salesforce/step-2.png?fit=max&auto=format&n=qn6A7RIhybLn0JXz&q=85&s=515edf805e1f0fc15176b4ec6459b4ed" alt="Goto your Oleria workspace, select Integrations → select Salesforce" width="800" height="293" data-path="images/integrations/salesforce/step-2.png" />
  </Step>

  <Step title="Authenticate">
    Provide your Salesforce URL and select **Authenticate**.
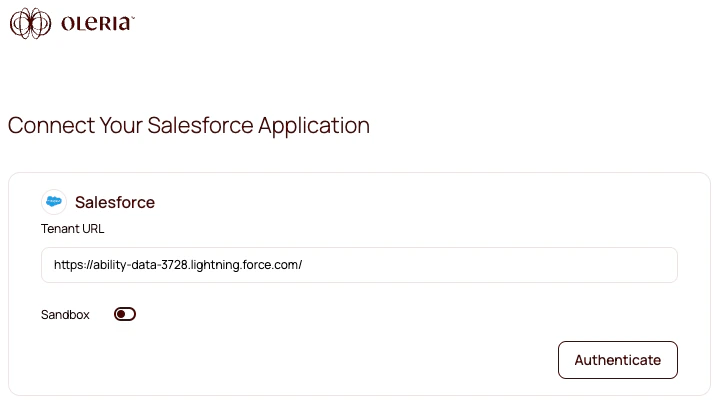
    <img src="https://mintcdn.com/oleria/qn6A7RIhybLn0JXz/images/integrations/salesforce/step-24.png?fit=max&auto=format&n=qn6A7RIhybLn0JXz&q=85&s=3d0411f4304f1ee7aa2428254da6db0a" alt="Provide your Salesforce URL and click Authenticate." width="724" height="408" data-path="images/integrations/salesforce/step-24.png" />
  </Step>

  <Step title="Confirm the connection">
    You can find the newly integrated Salesforce instance in your Oleria workspace connected integrations.
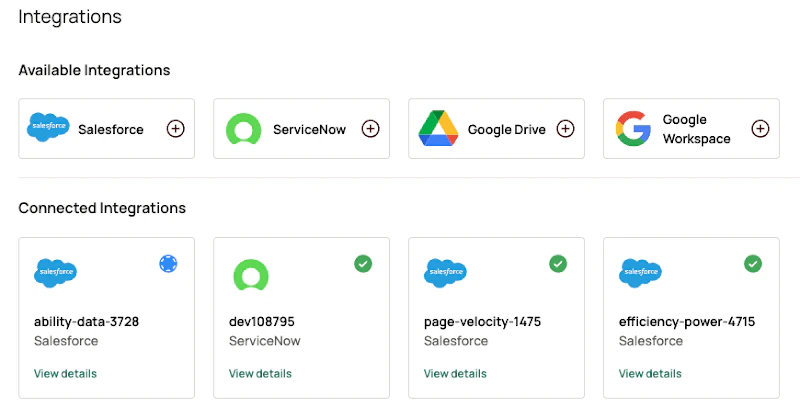
    <img src="https://mintcdn.com/oleria/qn6A7RIhybLn0JXz/images/integrations/salesforce/step-25.png?fit=max&auto=format&n=qn6A7RIhybLn0JXz&q=85&s=c43273f8233ca442df88db658e4d808a" alt="You can find a newly integrated Salesforce instance in your Oleria workspace connected integrations" width="800" height="407" data-path="images/integrations/salesforce/step-25.png" />
  </Step>
</Steps>

## Contact us

For questions about this integration, contact us at [support@oleria.com](mailto:support@oleria.com).